


One of the reasons why Windows 10 is popular is the features. Even after exploring so many features, there are always new ones that you can learn. In addition, with every new update, they bring new features that make the user experience much more rich and smooth.
Unified Write Filter (UWF) is one of these features that can help you prevent any system changes. It also protects the mass storage from write access. When you change settings, store or process data, and install applications, write access occurs. The UWF helps to divert access to the overlay buffer, which is actually a virtual memory.
However, you will not see any change in the operating system’s behavior. The overlay that is created in the RAM can also be created in the HDD and SSD. However, you need to know plenty of other things about this feature. Go through this article to find out all the details.
What Is A Unified Write Filter?
As mentioned above, Unified Write Filter (UWF) is one of the best features in Windows 10. When this feature is turned on, protected files will no longer be changed permanently. Instead, all the changes made to the files will be deleted after a restart.
Many people make the common mistake of confusing the UWF with EWF. However, both of them are very different from one another. UWF is very useful for people who want to ensure that the files and folders are not changed in their absence.
The Unified Write Filter works by protecting the file system of the selected partition in the local drives. It changes transparently and transforms the file system writing into a virtual overlay, where the changes are stored.
In all the previous versions of the Windows operating system, the write filters were available only with the integrated versions like industrial, kiosks, ATMs, self-service terminals, and others. The unified write filter is now available in Windows 10 and Windows 10 Education, Windows 10 Enterprise, etc. It opens a very new door to educational institutes and other companies.
How Do I Activate Unified Write Filter?
Now that you know a lot of things about unified write filters, you need to find out how to use them. There are some simple steps that you need to follow to configure and activate the unified write filter in Windows 10. Here are the steps are given below to help you turn on this feature in your Windows 10 PC.
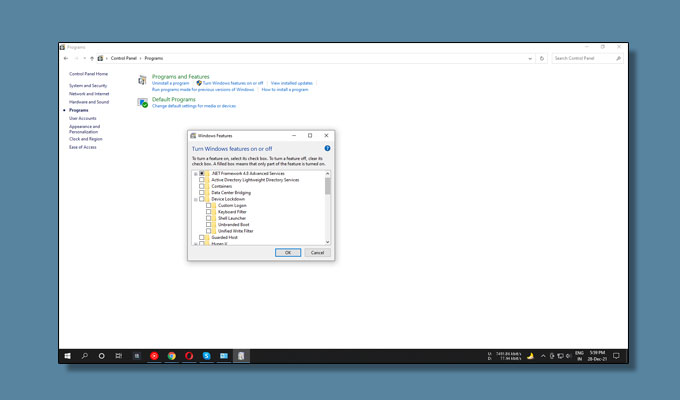
- Open the “Control Panel” and visit “Programs and Features.”
- From there, click on “Enable or Disable Windows Functions.”
- You will find the option “Device Lock.”
- From there, go to “Unified Recording Filter.”
Apart from this, you can also turn on the UWF function with the help of PowerShell. Here is the command that you need to apply given below.
“Enable-WindowsOptionalFeature -Online -FeatureName “Client-UnifiedWriteFilter” -All
Configure The Unified Write Filter

Once the Unified Windows option is enabled, you can restart the PC to start configuring it. To configure, you can use the uwfmgr.exe or the PowerShell (WMI) to configure the protection of the drives and other settings. Enable the filter to protect a volume. If you want to protect the C: drive, here is the command that you can put to enable the overlay filter.
Uwfmgr filter enable
Uwfmgr volume protect C:
After entering the command, restart the machine. Also, everything written to the disk during the user session will be discarded once the machine is rebooted.
As the changes are being discarded after every reboot, it will become much more challenging to service the machine. Some of the things like installing Windows updates or applications will be meaningless. To make the update to the machine in service mode, you will need to use the commands. Here are the commands are given below in detail to help you out.
uwfmgr servicing enable
After providing this service code, you will need to restart the computer. After the restart, the Windows will boot under the account UWF-Servicing and install the available update of Windows. It will also update the antivirus signatures along with it. If you want, you can also log in with the account of UWF-Servicing account.
After the UWF-Servicing user is logged in, the uwfservicingshell.exe starts running the scripts of Windows 10. Once it is in the Windows 10 service mode, you cannot do anything else.
Once the updates are installed, the computer will automatically restart in the normal mode with the UWF filter. To install Windows updates without the Servicing mode, you will need to take the help of this command.
Uwfmgr servicing update-windows
How To Add Unified Write Filter Exclusions
If you want to save a file that is force modified into the disk while the UWF filter is enabled, you will need to run this command.
Uwfmgr file commit C:\Labs\MyApp.exe
Now, even if you restart the Windows, the file will not be deleted. Therefore, if you want to delete a file that is UWF enabled completely, you will need to use this command.
Uwfmgr file commit-delete C:\Labs\MyApp.exe
Apart from this, you can also add certain directories, files, and keys to the UWF exclusions list. The changes you make in these items will be directly written to disk, not the overlay. Here is the command you will need to use to add a specific exclusion or folder.
Uwfmgr.exe file add-exclusion c:\labs
This might have helped you find out
One of the reasons why Windows 10 is popular is the features. Even after exploring so many features, there are always new ones that you can learn. In addition, with every new update, they bring new features that make the user experience much more rich and smooth.
Unified Write Filter (UWF) is one of these features that can help you prevent any system changes. It also protects the mass storage from write access. When you change settings, store or process data, and install applications, write access occurs. The UWF helps to divert access to the overlay buffer, which is actually a virtual memory.
However, you will not see any change in the operating system’s behavior. The overlay that is created in the RAM can also be created in the HDD and SSD. However, you need to know plenty of other things about this feature. Go through this article to find out all the details.
What Is A Unified Write Filter?
As mentioned above, Unified Write Filter (UWF) is one of the best features in Windows 10. When this feature is turned on, protected files will no longer be changed permanently. Instead, all the changes made to the files will be deleted after a restart.
Many people make the common mistake of confusing the UWF with EWF. However, both of them are very different from one another. UWF is very useful for people who want to ensure that the files and folders are not changed in their absence.
The Unified Write Filter works by protecting the file system of the selected partition in the local drives. It changes transparently and transforms the file system writing into a virtual overlay, where the changes are stored.
In all the previous versions of the Windows operating system, the write filters were available only with the integrated versions like industrial, kiosks, ATMs, self-service terminals, and others. The unified write filter is now available in Windows 10 and Windows 10 Education, Windows 10 Enterprise, etc. It opens a very new door to educational institutes and other companies.
How Do I Activate Unified Write Filter?
Now that you know a lot of things about unified write filters, you need to find out how to use them. There are some simple steps that you need to follow to configure and activate the unified write filter in Windows 10. Here are the steps are given below to help you turn on this feature in your Windows 10 PC.
- Open the “Control Panel” and visit “Programs and Features.”
- From there, click on “Enable or Disable Windows Functions.”
- You will find the option “Device Lock.”
- From there, go to “Unified Recording Filter.”
Apart from this, you can also turn on the UWF function with the help of PowerShell. Here is the command that you need to apply given below.
“Enable-WindowsOptionalFeature -Online -FeatureName “Client-UnifiedWriteFilter” -All
Configure The Unified Write Filter
Once the Unified Windows option is enabled, you can restart the PC to start configuring it. To configure, you can use the uwfmgr.exe or the PowerShell (WMI) to configure the protection of the drives and other settings. Enable the filter to protect a volume. If you want to protect the C: drive, here is the command that you can put to enable the overlay filter.
Uwfmgr filter enable
Uwfmgr volume protect C:
After entering the command, restart the machine. Also, everything written to the disk during the user session will be discarded once the machine is rebooted.
As the changes are being discarded after every reboot, it will become much more challenging to service the machine. Some of the things like installing Windows updates or applications will be meaningless. To make the update to the machine in service mode, you will need to use the commands. Here are the commands are given below in detail to help you out.
uwfmgr servicing enable
After providing this service code, you will need to restart the computer. After the restart, the Windows will boot under the account UWF-Servicing and install the available update of Windows. It will also update the antivirus signatures along with it. If you want, you can also log in with the account of UWF-Servicing account.
After the UWF-Servicing user is logged in, the uwfservicingshell.exe starts running the scripts of Windows 10. Once it is in the Windows 10 service mode, you cannot do anything else.
Once the updates are installed, the computer will automatically restart in the normal mode with the UWF filter. To install Windows updates without the Servicing mode, you will need to take the help of this command.
Uwfmgr servicing update-windows
How To Add Unified Write Filter Exclusions
If you want to save a file that is force modified into the disk while the UWF filter is enabled, you will need to run this command.
Uwfmgr file commit C:\Labs\MyApp.exe
Now, even if you restart the Windows, the file will not be deleted. Therefore, if you want to delete a file that is UWF enabled completely, you will need to use this command.
Uwfmgr file commit-delete C:\Labs\MyApp.exe
Apart from this, you can also add certain directories, files, and keys to the UWF exclusions list. The changes you make in these items will be directly written to disk, not the overlay. Here is the command you will need to use to add a specific exclusion or folder.
Uwfmgr.exe file add-exclusion c:\labs
This might have helped you find out how to filter files in Windows 10.
Frequently Asked Questions:
You will need to take only two simple steps to uninstall the HP Unified Write Filter. Here are the steps are given below.
• Open the HP Unified Write Filter Configuration utility.
• Visit the tab “General,” where you can choose to enable or disable UWF.
Here are the steps you can follow to turn off Windows Write Filter.
Click on Start and type “Turn Windows features on or off. Now, in the window of Windows Features, expand the Device Lockdown node to find the Unified Write Filter and click on “OK.”
The UWF needs to be enabled from the control panel to use in the Windows 10 Enterprise. This whole operation can be done with the help of these steps.
• Press Windows and X together, click on “Programs,” and turn the Windows features on or off.
• From there, you can expand the “Device Lockdown” folder and mark the “Unified Write Filter.”
UWF can protect the most supported storage types like solid-state drives, physical hard disks, external SATA devices, internal USB devices, etc. However, you cannot use the UWF with the target to protect USB devices, removable drives, and flash drives.
Conclusion
There are plenty of features available in Windows 10. It is tough to find out all the details about them if you are unfamiliar with them. Don’t worry; we will help you find out and learn the details. You can find all the details about Unified Write Filter from this article. Make sure to go through the article to find out all the information.
If this article has helped you learn a lot about the Unified Write Filter (UWF), make sure to share it with others. Also, share your thoughts and feedback in the comment section below to help us find out more.
More Resources: